
Introduction to Twine
by Conor Walsh
What is Twine?
Twine is an open-source, free program that allows users to create interactive media through the use of interconnected slides of text. It is used primarily, according to the Twine website, “...for telling interactive, nonlinear stories.” However, due to the open nature of its design, Twine can be much more versatile than this. A user who simply wants to create an interactive story wherein the player chooses certain options to advance the plot, leading down different paths, could do so without ever delving into coding whatsoever. A user who wishes to give their players more agency, however, can use coding elements to create simple puzzles that must be solved in order to progress, or could even go so far as to develop complex inventory and statistic-management systems that a player must manage as the story develops.
Twine is useful for more than mere game development as well. A savvy teacher could build a Twine with a variety of interactive elements, such as text that can be clicked to reveal pictures or further information about certain topics. This would allow students a greater degree of agency in what they’re learning, and would help to keep them interested. What’s better is that the program is very beginner-friendly, and easy on the eyes, but can also be as complex as the user may want it to be.
This guide will not tackle all avenues or possibilities that Twine is capable of, for the list would be long and almost impossible without creating a document that’s hundreds of pages long. Instead, I will show you the basics of how Twine 2’s Harlowe format (I will explain what a “format” is later) can be used to create a simple interactive story. With these tools, you will hopefully have enough confidence to try to make your own Twine!
Intro to Program
Before the program can be used, it must be downloaded. Twine 2 can be downloaded at http://twinery.org/.
Upon being opened, the user will be brought to a blank screen with several buttons on the side.
For now we’ll only worry about the button in the top right. Click this button to create your first Twine document.
After clicking this and naming your document, you will be brought to a grid with a single square labeled “Untitled Passage” There will also be a series of buttons at the bottom of the screen.
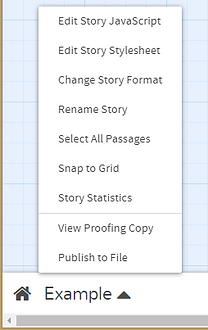
Before we go any further, however, there are a few matters of note. Foremost, I mentioned above that we’ll be using the Harlowe “format” in this guide. If you click the arrow at the bottom-left of the screen, next to the name of your story, you will be brought to a menu.
This options menu allows you to change your story’s name as well as some of the other presentation options, such as the actual visual style of the story or overarching JavaScript elements that it will implement. For now we’ll only be worrying about the button labeled “Change Story Format”. Clicking it will open the following dialogue box:
Each “format” is essentially a different programming language that Twine can use. The default, Harlowe 2.1.0, is the most beginner-friendly out of the three formats, with a code style that is easy on the eyes and simple to understand. Sugarcube is essentially an “intermediate” format, bearing more functionality than Harlowe but less ease-of-use. Snowman is the most “minimalistic” of the three formats, and is most frequently used by experienced programmers who want a flexible format at the cost of accessibility. You may close this dialogue box now.
It also bears mentioning that undoing text in Twine is unreliable, and there is no redo feature. A user can press Ctrl+Z or “Undo” in the “Edit” tab to remove whatever character was most recently entered. There is no way to “redo” a change aside from retyping it, however, and you cannot undo a deletion. Also, if a user closes a slide and re-opens it, none of the text can be undone, and must be deleted by hand.
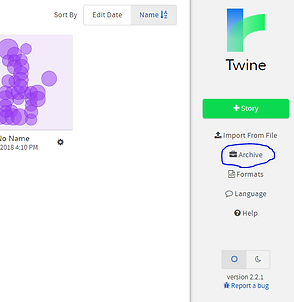
There is also no manual “save” function in Twine 2; instead, progress is automatically saved on your computer. Though I haven’t had any problems with it myself, it’s been reported that Twine’s autosaving is finicky, and can corrupt your files. In order to make sure none of your data is lost, you should periodically create Archives of your files. To do this, go back to the main menu and click the “Archive” button. This will create a copy of your stories somewhere on your computer that can be re-loaded by clicking “Import From File” should something happen to your data.


Basic Designing in Twine
With that finished, let’s continue.
Double-clicking the slide labeled “Untitled Passage” will bring you to the following screen:
This first slide will be the opening slide of your Twine, and the first thing your players see after opening your game. You can change the “Untitled Passage” text at the top to anything that might remind you of what the passage is actually about. I, for example, will choose to re-title it “Opening” so that I can remember that this is the first slide in the Twine. Players will not see title text.
Your Twine’s visible text will be composed of everything in the field labeled “Double-click this passage to edit it.” You can begin your story here, writing whatever it is you might want your story to start with. Here is an example of an opening passage:
In order to transition to other slides, and to give players options, you must make use of Hyperlinks. Hyperlinks are hard-coded lines of text that allow the user to move between slides. In order to create a Hyperlink, simply write a line of text in between two sets of brackets. This will bring the player to whichever slide is within the brackets. For example, a Hyperlink written as “[[Go to the store]]” in the slide would bring the player to a slide named “Go to the store” when clicked. If you want the text to be different than the slide name, write the Hyperlink as follows: [[Visible Text->Actual Slide Name]]. Here is an example of Hyperlinks in action:
This comprises the most basic information on Twine creation. Pressing the “Play” button at the bottom of the screen will bring you into a testable version of your Twine, which will allow you to look at your text in-game.


Text Formatting
With just the information above, you would be able to create your own working Twine. However, even this would have its roadblocks, as there are many “simple” things that must be learned in order to be performed in Twine. For example, text formatting, the ability to bold or italicize words to add emphasis, is more complex than it would seem. Twine doesn’t have a toolbar of formatting options as might be found in Microsoft Word or Google Docs, and as such it might not be abundantly clear how to italicize or bold a block of text. Users must use characters such as backslashes or asterisks in order to elicit certain changes in style. These “formatting codes” are as follows:
Italics: //Text// or *Text*
Bold: ‘Text’ or **Text**
Strikethrough: ~~Text~~
Superscript: ^^Text^^
In order for any of these formatting changes to take effect, there must be two special characters before and two characters after the text in question. If two aren’t placed on either side, the characters will simply show up normally in the text.
Coding
More in-depth formatting is accessible, but not without the use of code.
While the idea of coding can be intimidating, Twine 2’s Harlowe makes it fairly simple. The format is straightforward; in order to activate a “macro”, which is a line of code that has a set function, the user only has to type said “macro”, follow it with a colon, add any additional information (this is macro-specific and will be mentioned as-needed in the following pages) and put the entire thing in parentheses. For example, typing (print: 54) will simply show the number 54 when the Twine is played. In order for a macro to affect a line of text, the line of text must follow the macro, and the line of text must be contained within only one set of brackets. Take the example included below:
A matter of note: if the text you hope to affect is contained within two sets of brackets, you will create a Hyperlink instead. If you want your code to affect a Hyperlink, contain the Hyperlink in a third set of brackets. It also bears mentioning that some macros work differently than others; while some work on text through the use of brackets, others can only work on text written within the parentheses. Whatever the case, make sure your use of parentheses or brackets is parallel, or in equal number on either side of your code, as a failure to do this will result in errors in your code.
Due to the many different types of macros and their many different uses, it would be difficult to detail all of the possible combinations within this document. Instead, I will detail three simple macros that, if used properly, will give your Twine project, whether it is a story or a teaching resource or something else, a much greater degree of interactivity and variation.
The simplest of the three is the (either:) macro. This macro is essentially a randomizer for any entered text. For example, if a user enters (either: 1, 2, 3, 4), one of these numbers will be randomly selected each time a player views a slide. This can also be used with lines of text, description, or dialogue. If you wish to randomize lines of dialogue, however, you must put backticks (`) on either side of your quotation marks, or the quotation marks will not appear. An example is as follows:
Though this adds a certain level of replayability to your Twine, the use of the (either:) macro does not necessarily result in a consistent, or controllable, experience. Two other, slightly more complex macros can allow you a much greater degree of control over your Twine through the use of variables.
A variable is a line of code that contains a set value. It is essentially like writing a number down on a piece of paper, except coding a variable stores the variable value. This value can then be checked, or changed, by lines of code, and used to cause certain outputs. Variables in Twine have a special character that must precede them ($) without a space in order for Twine to properly identify them as a variable. For example, if I wrote (set: variable to 3) Twine would respond with an error. However, if I wrote (set: $variable to 3), Twine would properly set the variable $variable to 3.
Variables do not need to be given numerical values; they can also be given text values instead. Below are a few examples of potential ways of writing variables.
Though there are many ways to write, and many ways to check, or act according to the value of, variables, the simplest way to check them while still using as much of their utility as you can to affect your game is through the use of the (if:) macro. An (if:) macro is a line of code that checks if something is the case and, if it is, outputs something in response. You can use (if:) macros to check the values of certain variables that you’ve set earlier in your Twine, and to cause changes in your text in response.
The way an (if:) macro is documented differs slightly from the other macros mentioned so far. An (if:) macro is written as such: (if: $variable is num)[output], where “variable” can be substituted for any variable name and (value) can be substituted for any number or word. An example of a working (if:) statement is as follows:
This example will print the line “Thanks for calling earlier. I’ve decided not to fire you.” if the value of $apology was set to 1 earlier in the Twine. However, in this example, if $apology was not set earlier in the Twine, or if it was set to a different value, nothing will be printed when this slide is reached. If you want something different to be displayed for a different variable value, you can simply write another (if:) statement immediately after the first. An example of (if:) code with two possible options based on code is below:
In this situation, the player could have a value of $apology that is equal to 1 or 0. Each situation will have a different output; both outputs cannot activate at the same time because $apology can only have a single value.
In some cases you may only want an output to fire if you have a specific variable value, and for there to be only one different output for all other cases. This can be done by using the (else:) macro. The (else:) macro functions similarly to the (if:) macro, except you don’t need to specify that it only will affect a specific variable value. An example of the (else:) macro in action is below.
In this example, a player can only get into an establishment if the “$money” variable has a value of more than 1000. If $money is set to 1000 or less the line will read “Nobody gets in without an appointment.” In this example I also used a caret (>) symbol in the (if:) macro. By using a caret, a user can check for a variable having a value greater or less than the number written in the macro. So, in this example, a player must have 1001 dollars or more if they want to get into the establishment.
Ultimately Twine has many more options when it comes to usability, even with variables alone, than I have listed. However, by knowing how to use even just the above variables and macros, you should be able to give your Twine stories and teaching tools a much greater range of flexibility.


Publishing
When your Twine is finished, you may wish to make it accessible to others. In order to do this, you must publish your Twine as an HTML file. To do this, click the triangular button on the bottom left of the main Twine screen. A number of options will come up; the one at the bottom will say “Publish to file.”
Click “Publish to File”. From here you can save your Twine wherever you want on your computer. This file, when double-clicked, will open your Twine up as a game, and can be freely played by anyone you send it to who has the same type of browser (Google Chrome, Firefox, Internet Explorer) as you.

Conclusion/Further Learning
I hope this document was informative. Though it is more of an introduction than a complete guide to the more complex elements of Twine, I believe it is sufficient for those who wish to use Twine in a capacity beyond the most basic but who don’t wish to spend hundreds of hours working out all of the finest elements of the program. For those who do wish to broaden their learning, however, I have contained a few links to other web resources.
The Harlowe documentation contains a large number of macros and potential applications and examples for their uses. It is what I used primarily while crafting my Twine and this guide. Users who hope to know how to use more complicated macros to customize their stories can find more information here: https://twine2.neocities.org/
The “Twine Cookbook” gives information on how to do the same thing in each of Twine 2’s different formats (Harlowe, Sugarcube, Snowman). It goes into further detail on many of the concepts mentioned in this resource: https://twinery.org/cookbook/
This page contains a number of links to different video tutorials that can teach users how to use Twine to accomplish more complex functions in detail. These tutorials span all of Twine’s formats and allow users to see Twine coding in action: https://videlais.com/twine-tutorials/
The Twine 2 guide gives some information about the different languages that Twine 2 can make use of but lacks proper development in some places and is unfinished in others. Some information about Twine’s more complex functions, such as using JavaScript or HTML coding, can be found here: http://twinery.org/wiki/twine2:guide