
BEGINNING PYTHON FOR DIGITAL HUMANISTS
by R.C. Carlson
This document will outline the steps to downloading and installing Python and then writing and running a code that can be used to create a simple web page. Though this Python tutorial involves a little bit of HTML (Hypertext Markup Language – a coding language used to build web pages), no prior knowledge of HTML will be required. I will provide an HTML phrase that you can copy and paste into your Python code. The purpose of this tutorial is not only to introduce Python to those who are interested in learning code for website development, but also to demonstrate the wide range of functions Python is capable of performing.
{
{
Introduction
***
Why Python?
According to programming guru Chris Hawkes (and others familiar with the seemingly nebulous world of coding), Python is the best language for beginning programmers. This is because Python is both procedural and object-oriented. Procedures instruct a computer to carry out a series of functions using a simple word or phrase. For example, when someone tells you to “Go”, that single word carries a set of instructions that ultimately initiates action. In procedural coding languages, the word “Go” serves as a synecdoche for a series of actions the computer will take in order to make a code run. Object oriented languages, on the other hand, rely on variables that carry numerical values to execute code. Not many coding languages are capable of more than one mode, which when combined with Python’s reliance on English words as inputs, makes it both flexible and user-friendly. Python is used behind the scenes of many popular social apps and websites including Pinterest, Instagram, Google, and countless more. The following tutorial for humanities students and professionals is meant to provide an introduction to the subject with a focus on web design, an increasingly in demand skill set even for those with a background in humanities. For more information on Python’s philosophy, abilities, and history, visit the Wikipedia Page, Python (programming language).
Getting Started
Now that you have a basic knowledge of what Python can do and why you should learn it, it’s time to get started. To begin, you will need to download two new programs: Python, and a text editor. To download Python version 3.6, visit the Python website. Finding the right text editor took a bit of experimentation, but I eventually settled on Microsoft Visual Studio Code. I like Visual Studio Code because of its unintimidating interface and easy debugging window (see figure 1). I also tried Komodo Edit and PyCharm, but I had a difficult time even locating the “run code” button in each. The remainder of this tutorial will feature screenshots from Visual Studio Code, but I encourage you to search around for the text editor that serves your learning style best. For a list of other text editors, check out this article from Slant.

Figure 1: Screen capture of standard operating window within Microsoft Visual Studio Code.
Setting Up Your Device
Once you’ve downloaded and installed Python and a text editor, its important to set up your device in such a way that makes finding all the necessary applications and files easier. For ease of use, I recommend creating a new folder titled “Python Projects” and saving it somewhere you can easily access it (I chose to keep it on my desktop). This is where you will be saving all of your code. I was surprised to learn early on that I would actually be using Visual Studio Code far more often than Python. With that in mind, I suggest keeping Visual Studio Code in the bottom bar of your desktop. You can also keep Python here, but in these beginning stages, it isn’t necessary. If you do choose to keep Python on your desktop, you may be surprised to find that the application itself is not called Python, but IDLE (figure 2). At any point, you may copy and paste code from Visual Studio Code to IDLE just to see it run in Python itself, however, this is not necessary. The only difference between IDLE (Python) and Visual Studio Code is that IDLE does not help with troubleshooting.
Once you’ve downloaded and installed Python and a text editor, its important to set up your device in such a way that makes finding all the necessary applications and files easier. For ease of use, I recommend creating a new folder titled “Python Projects” and saving it somewhere you can easily access it (I chose to keep it on my desktop). This is where you will be saving all of your code. I was surprised to learn early on that I would actually be using Visual Studio Code far more often than Python. With that in mind, I suggest keeping Visual Studio Code in the bottom bar of your desktop. You can also keep Python here, but in these beginning stages, it isn’t necessary. If you do choose to keep Python on your desktop, you may be surprised to find that the application itself is not called Python, but IDLE (figure 2). At any point, you may copy and paste code from Visual Studio Code to IDLE just to see it run in Python itself, however, this is not necessary. The only difference between IDLE (Python) and Visual Studio Code is that IDLE does not help with troubleshooting.
{
{
Figure 2: Screen Capture of Python/IDLE desktop icon.
First Code: "Hello World"
With all the apps downloaded and folders properly arranged, now it’s time to write your first code. When you open Visual Studio Code (VSCode), you will be welcomed by this screen (figure 3). On the left side, there are five icons. The only ones you will use as a beginner are the first (Explorer), the fourth (Debug), and briefly, the fifth (Extensions).

Figure 3: Visual Studio Code Welcome Screen. Left bar icons from top to bottom: Explorer, Search, Source Control, Debug Console, and Extensions.
Before you begin, click the last icon on the left column entitled, “Extensions”. In the search bar, type “Python”, find the Don Jayamanne version, and click the green “Install” button. Next, click the “Explorer” button (first icon on the left bar), select the blue button that reads, “Open Folder”, and choose the Python Projects folder you created in the last section. Then, you will be returned to the Welcome Page, where you will select, “New File”, and then save it as “Hello World” in your Python Projects folder (see figure 4).
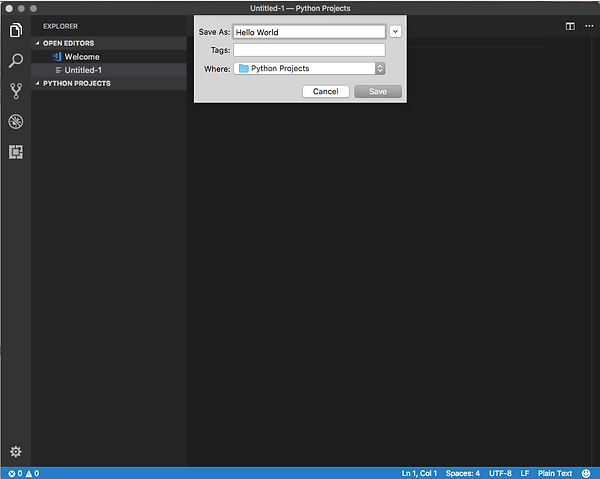
Figure 4. Python screen capture: save “Hello World” to “Python Projects” folder. “Python Projects” folder is visible under the Explorer tab on the left.
Once you have started and saved this new file, it’s time to jump in to writing. Since Python is procedural and object oriented as discussed earlier, the commands you will give it will be relatively close to human language. Let’s begin with the coding equivalent of a “1, 2, 3, testing”: the “Hello World” code. To begin writing your code, click the Debug button (fourth down on the left hand column), place your cursor in line one, and simply type:
print("hello world")
In the top left corner, you will see a small green arrow. Click this to start debugging (a fancy word for testing) your code. Once you click this first arrow, a new bar will appear at the top of the page with a second green button. Press this second arrow to finish running your code (see figure 5).
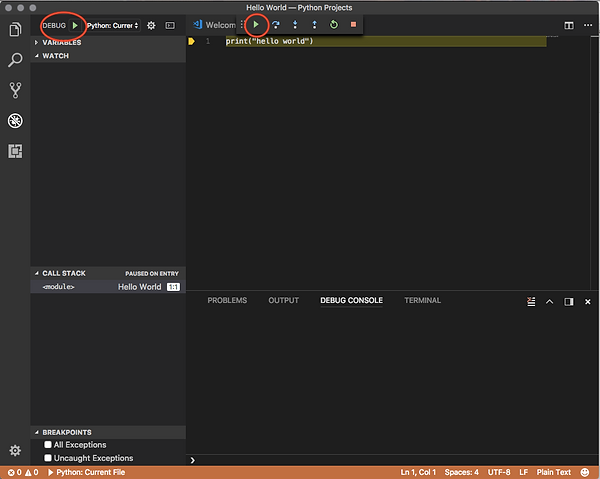
Figure 5: “Hello World” code with green arrows circled in red.
Once you have clicked both green arrows, provided your syntax (coder speak for word arrangement) is correct, a very simple and satisfying, “hello world” will pop up in the Debug Console below.
Note: Every time you run a code during this project, you will return to the Debug window
and click the green arrows in this very same manner.
Now that you’ve run your first code, feel free to play around with it for a bit. I enjoyed typing up silly sentences within the print(“any words you want”) framework. When you are finished, be sure to save your work so you can look back on your very first dive into the vast ocean of coding. For detailed video instructions, see Chris Hawkes’ first video tutorial on Python.
Strings in Python
One of the most important things to understand as a new Python user is how strings (different chunks of code) can interact with each other within your code. To demonstrate this, we will build on the “Hello World” code you just wrote. If you would like to create a new file to keep each step separate, return to the Welcome screen, select “New File”, and save it to your “Python Projects” folder. Whether you are using your original “Hello World” file or a new file, make sure that the print(“hello world”) code we created in the previous section is in line 1 of your code for this new project.
Next, we will add in a variable, “x”. Beneath print(“hello world”), create a new line that says:
x = “hello world”
and beneath that a new line that reads,
print(x)
Now, when you run your code, it will read “hello world” twice (see figure 6).
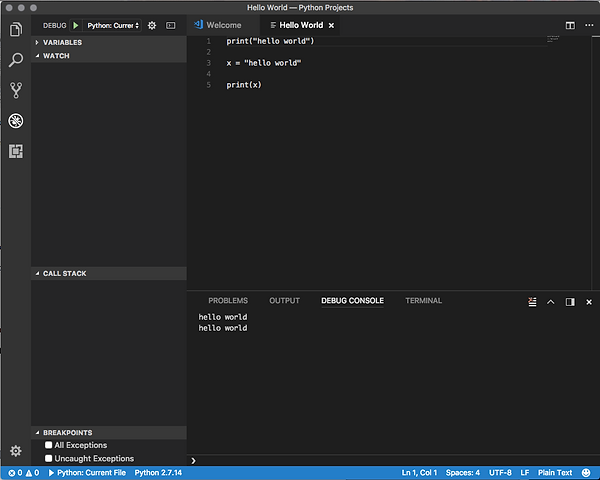
Figure 6: “Hello World” code with a variable introduced.
Next, we will add a second variable, “y”. You can assign this new variable any value you wish, but I chose y = “this is my first python code”. This time, within the print function, try putting together print(x + y) to see how the different strings can interact. When you run the code, your result should look like this:
hello world
hello worldthis is my first python code
This is very exciting, but I am sure you noticed the lack of space between “world” and “this”. To resolve this, add a space between the quotations and first word of the y-variable. Instead of y = “this is my first python code”, try y = “ this is my first python code” (see figure 7). This is called concatenation.

Figure 7: With a space between the quotations and the first word of the y-value, the code runs with a space between words.
This same process can be reused in countless ways. You can even rename your variables things like, “my_first_variable”, “my_second_variable”, and so on. Try adding more values and adding them together in unique combinations. For more information on this process, see Chris Hawkes’ second Python video tutorial.
***
Python for Basic Webpage Design
Now that you have learned some of the basics of coding in Python, let’s try a practical application. I will provide you a few lines of html to copy and paste into your own code, and we will use the concept of strings to turn it into a very basic webpage. Begin creating a new file and saving it to your Python Projects folder. I called mine “firstproject”.
Given:
<html>
<head>
<title>Insert Your Title</title>
</head>
<body>
<h1><font face=helvetica color=black>Insert Text<h1>
</body>
<h1><font face=helvetica font size=10 color=black>Insert somebody text here
</body>
All of the “Insert text” areas can be edited with regular English text without affecting the code. You also have the option to change all of the font faces, sizes, and colors as you wish. When you copy and paste this phrase, assign it to variable “x”, and place it within three quotations at opening and closing (see figure 8). At the moment, this code will not perform any visible action when you run it unless it is incorrect. If you receive an error message, double check the syntax to make sure it matches the example.
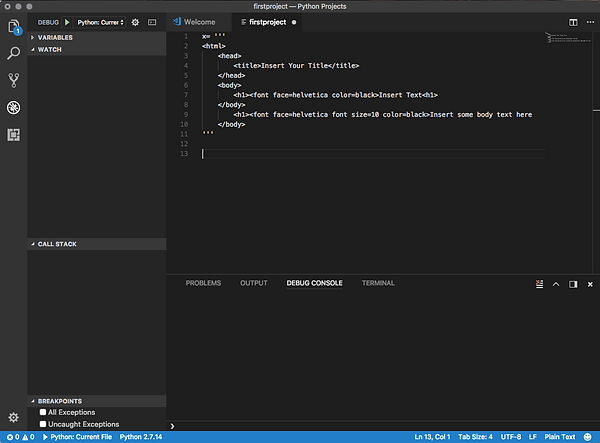
Figure 8. Proper syntax and formatting of given html code.
Now that you have the given HTML code formatted in VSCode, it’s time to bring in a few lines of Python to create a product. On the next line, create a new variable called “my_html_file”. What we want to do at this point is to open the HTML we have just written so that it can become a webpage. To do this, you will need to instruct the file to open. To open the file, you will need to locate it within your computer. This is achieved by instructing Python to go to the folder where the file you are calling up is saved. If you followed my example and saved your Python Projects folder to your computer desktop, your call function (the string that instructs Python to open a certain file) will look something like this:
/Users/yourcomputerusername/Desktop/Python Projects/firstproject
When placed into your Python code, it should look like this:
my_html_file = open(“/Users/yourcomputerusername/Desktop/Python Projects/firstproject”)
Be sure to run this code and make sure no errors pop up in the debugging console. Should any errors pop up, double check your syntax, and check that you are instructing the code to search for your file in the right location on your device. At the moment, your progress should look like this (see figure 9):
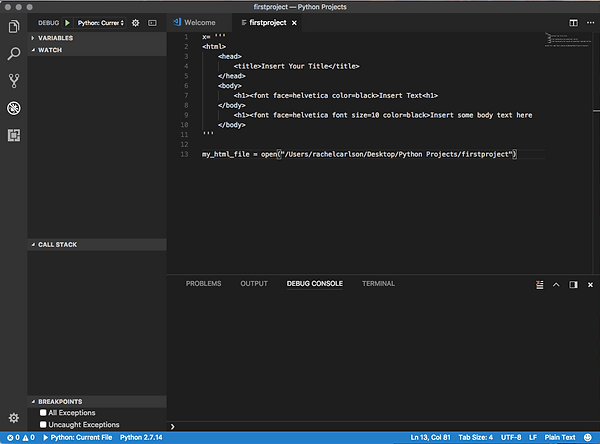
Figure 9: Penultimate step before completing the code for a basic webpage.
Now, we are going to instruct this code to overwrite and then rewrite itself so that it may become a webpage. Warning: Do not run your code until this process is complete, or the overwrite function will cause all your work to delete itself. At this point, I highly recommend saving your work if you have not already.
Select line 13 of the code pictured in figure 9. Immediately after the call function in quotations, write:
, “w”. The whole line will look like this:
my_html_file = (“/Users/Desktop/yourcomputerusername/Desktop/Python
Projects/firstproject”, “w”)
The “w” instructs the file to overwrite itself. This essentially means it deletes itself: For our purposes, this must happen to make way for a new file type. Next, we will instruct Python to rewrite this file, using HTML, or our “x” variable assigned to the given HTML from the top of this section. This next line should read:
my_html_file.write(x)
In order to finish out this project and save our work as a basic webpage document, we will need one last line of code instructing the previous lines to stop running, or “close” after it has overwritten and rewritten itself. Your final line of code will be (see figure 10):
my_html_file.close()
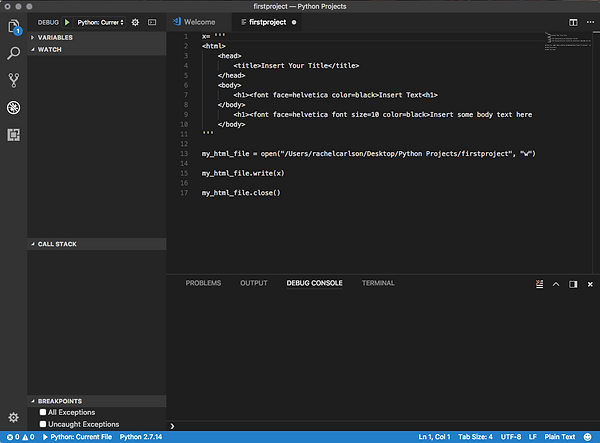
Figure 10: This is the completed code.
When you run your completed code, the last three lines, which instruct the code to overwrite and rewrite itself as a new file type, will disappear. To view your finished project, visit your Python Projects folder, and select the file name of your first project. The final result should open on your web browser, and look a bit like this (figure 11):
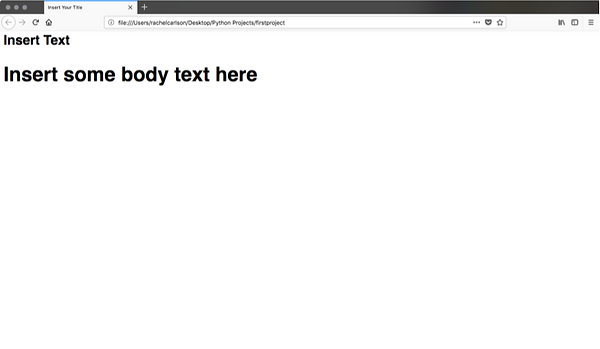
Figure 11: The finished product of the introductory code for website development.
Now that you understand the basics of programming a webpage using Python and VSCode, feel free to go through the given HTML template and adjust the page’s text, font style, size, and color. For more information on ways to personalize this page, visit Chris Hawkes’ YouTube playlist on Python for Beginners, or this resource by w3schools on basic HTML principles.
***
Reflection
Learning to code has been an aspiration of mine for years. Though this project gave me the opportunity to put my technical literacy to the test, I was surprised by the difficulty I faced in picking up the basics of Python. I struggled through many written tutorials and then video tutorials until I found something that worked for my learning style. This biggest confusion I faced was finding a text editor that was user-friendly enough for an absolute beginner. Once I found Microsoft Visual Studio Code, however, learning the basics of Python was smooth sailing.
Many of the help forums I consulted for troubleshooting were blogs by coding gurus for coding gurus. I had a very hard time resolving bugs with such resources, and my learning was slowed. While I did make the greatest gains with the help of Chris Hawkes’ YouTube channel, videos are not everyone’s preferred mode of learning. I believe taking the approach that serves your preferred learning style is the best when learning Python, so I aimed to appeal to each learning style in this tutorial.
During my work with Python, I found myself backtracking to try and understand the underlying philosophy and vocabulary of the programming language, so I decided that it would be best to deviate from tradition and address these core concepts right away in my document. The next roadblock I encountered was formatting this Tech Web Resource.
At first, I considered including a glossary. After a first draft with a glossary, I worried that my tutorial would be too jargon-y and deter readers from fully grasping the meaning of the text, which is very important to understanding Python. I believe that a foundational knowledge is very important to those with humanities backgrounds, so I attempted to paint a bigger picture before I dove into the gritty details of Python. My next draft used footnotes with superscripts as a space to define technical terms, however, I found this draft to be even more problematic than before once I considered how these footnotes would translate to a lengthy web page. Instead, I opted for in-text explanations of important information to make sure this document would be as straightforward and usable as possible.
I thoroughly enjoyed the process of learning the basics of Python and look forward to expanding my skills beyond the scope of this project.